Ready to Tri?
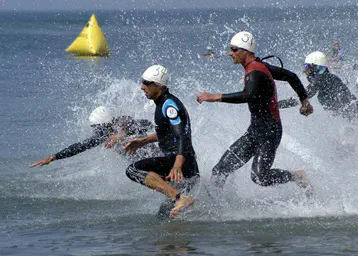
I’m Coach Mark, and today’s topic is getting started as a triathlete. I have been competing as an amateur triathlete for about 10 years. I’m surely not fast (Sprint PR: 1:22:53, Olympic PR: 3:01:29), and I haven’t competed in any Iron distance events, but I have completed more than 30 sprint and olympic distance triathlons. And I’ve found the sport very fun and rewarding … and very different from what I expected at the start. So let’s talk triathlon, particularly how to get started …
Triathlon can be an intimidating sport, seemingly accessible to only those with superhuman strength and endurance. And that may be because the most visible form of the sport is the IRONMAN® series, which features races as long as 140.6 miles. But just as running isn’t only about the Boston Marathon, triathlon has many race distances and levels of participation.
Lately, I’ve been noticing posts in social media from people who are interested in triathlon, but don’t know how to get started. Great! Unfortunately, some say something like “I’ve signed up for a 70.3 distance triathlon, but I can’t swim and I don’t have a bike. What should I do? What gear do I need?” It’s a bit like saying “I’ve signed up for a marathon, but I’ve never run before. What kind of shoes should I buy?”
This article is intended to help you get informed before you jump in. I’ll cover the basics, including when to sign up and how to get ready.
What is Triathlon?
Triathlon is a multi-sport discipline made up of three legs: swim, bike, and run. In between each leg is a transition (T1 and T2), in which you switch gear and get ready for the next leg.
It’s worth noting that there are several related multi-sport disciplines, including Duathlon (bike-run or run-bike-run) and Aquabike (swim-bike). And there are alternative forms, such as Paddle Triathlon (which includes a Kayak or SUP leg, instead of swim). There are many wonderful (and some wacky) varieties of multi-sport, but we’ll primarily focus on standard triathlon.
In the US, there are four common triathlon distances:
| Event Distance | Swim Distance | Bike Distance | Run Distance |
|---|---|---|---|
| Sprint | 500 m or 750 m | 20 Km | 5 Km |
| Olympic | 1500 m | 40 Km | 10 Km |
| 70.3 (AKA Half Iron) | 1.2 Miles | 56 Miles | 13.1 Miles |
| 140.6 (AKA Iron) | 2.4 Miles | 112 Miles | 26.2 Miles |
Many events have multiple multi-sport races running in parallel, each a different format or distance. For example, you might see a race offer Triathlon, Duathlon, and Aquabike, at Sprint and Olympic distances, all in parallel. Some events also include Super Sprint or Tri a Tri distances, which are shorter than Sprint (distances vary from race to race).
So, just as running isn’t just about the marathon, there are a variety of forms and distances of multi-sport racing, which make it more interesting and accessible. And, just as a 5K isn’t just an “easy” running race, a Sprint Triathlon isn’t necessarily easy. It’s all about the effort you put in and the result you achieve.
Sound intriguing?
Do I need to be able to … ?
Here are some common questions you might have at this point:
- Do I need to be able to swim?
Yes, you need to be able to swim. But any stroke will do. Freestyle is most prevalent, but breast stroke is common for people who are not strong swimmers. If you really can’t swim, consider other multi-sport events, such as Duathlon or Paddle Tri.
- Do I need to be able to run?
No, you are absolutely allowed to walk. This is not uncommon for people who are injured or who just aren’t runners. Walk-run strategies are also common.
- Do I need a triathlon bike?
No, you absolutely do not need a triathlon bike. A road bike is a great choice for triathlon. While not ideal, some first timers use mountain bikes or commuter bikes. Use what you have.
What do I need to participate?
So you want to do your first Triathlon? That’s great, but there are a few things you will need first. Luckily, you don’t need a ton of gear to get started.
Swim Gear
Basic swim gear
To do the swim portion of a triathlon, you need at least a swim suit and goggles. Really, that’s it! You don’t even need a swim cap. Most races provide caps to each participant, with a color matching your start wave (more on that later). The best option for a swim suit would be a brief or jammer (for men) or a one-piece (for women).
Note that whatever you wear for the swim you will typically be wearing for the rest of the race. Opportunities to change out of your swimming gear are limited (and time consuming). So choose wisely.
Tri Suit
If you have a few more dollars to spend, you may want to invest in a Tri Suit. A Tri Suit is a one piece suit intended to be used throughout a Triathlon (all three legs). Like cycling shorts, a Tri Suit is meant to be worn against the skin (underwear tends to chafe, especially when wet). The bottom is a bit like cycling shorts, with a pad for comfort on the bike. Unlike typical cycling shorts, however, the pad is thin enough to allow you to swim and run in it, and quick drying. The top of the suit is form fitting enough to not create drag in the water or on the bike and breathable to be cool on the run. You can also buy separates: Tri Shorts and a Tri Top.
There are many brands of triathlon clothing. Here are a few: Zoot, 2XU, Castelli, ROKA, Zone3, and SLS3.
Wetsuit
If you have a few more dollars to spend, you can buy a triathlon wetsuit. Wetsuits are popular because the keep you warm and provide buoyancy for the swim. You will wear your wetsuit over your swim suit or Tri Suit, and remove the wetsuit after the swim (in the first transition).
It is important to note that a triathlon wetsuit is different from wetsuits intended for diving, surfing, or boogie-boarding. The materials and design are intended for (relatively) efficient swimming (buoyant in the back and allowing shoulder rotation). So be sure you have the right type of wetsuit. It is also worth noting that this is a seasonal item. So, you can save significant cost by planning ahead and buying in the off season (late summer or early winter) or during sales.
If you are not ready to buy a wetsuit, consider renting one. Some races offer rentals. Local shops and even online shops also rent triathlon wetsuits. Just be sure to get a wetsuit intended for triathlon.
However you get your wetsuit, make sure it fits properly. A poorly fitting wetsuit is worse than no wetsuit. It should be skin tight. Check with the manufacturer for sizing recommendations. Buying from the manufacturer is also recommended because they typically allow returns (check their policy). See the Other Resources section for videos on wetsuits.
Also know that use of a wetsuit in triathlon is dependent on water temperature. For most races, these rules apply:
| Water Temp | Wetsuit Use | Notes |
|---|---|---|
| 60.6°F and below | Mandatory | |
| 60.7 to 78.0°F | Permitted | Swimmer’s choice |
| 78.1 to 84°F | Allowed | If you choose to wear a wetsuit, you can’t win an award |
| 84.0°F and above | Prohibited |
For more details, see the USAT Rulebook.
There are many brands of triathlon wetsuits. Here are a few: Zoot, BlueSeventy, Xterra, TYR, Orca, ROKA, and 2XU.
Footwear
No footwear is allowed in the swim portion of a triathlon.
Cycling gear
Bike
If you’ve watched an IRONMAN® triathlon or a triathlon even at the Olympics, you’ve probably seen participants using a triathlon bike or TT bike. Such a bike is a luxury for an amateur triathlete, not a necessity.
To get started in triathlon, you need a bike. But it can be any bike. If you are just getting started, use whatever you already have. Really! You might even be able to borrow or rent a bike. Your best bet is a road bike, but a mountain bike or commuter bike would be fine. As long as it’s got wheels and is entirely pedal powered, you are good to go.
If you do choose to buy a bike, it is always best to start with a bike fit. A reputable bike fitter can take your measurements and have you pedal on a test bike to determine your best fit. They can then recommend brands and sizes that will best fit your body. In addition, a biker fitter can set up your new bike to fit you once you buy it.
Along with a bike, you may want to choose a saddle that fist you best. Again, a bike fitter can help with that choice.
Helmet
You will also need a helmet. USAT-sanctioned races (and likely all other races as well) require a helmet approved by the US Consumer Product Safety Commission (CPSC).
Pedals and shoes
If you have a few more dollars to spend, you might consider upgrading pedals. Here are your options:
- Flat pedals are just that: a flat pedal. Advantage: Zero learning curve. While cycling, you can use the same shoes for the bike and the run. Disadvantage: This is the least efficient option.
- Toe cages attach to your pedals and you slip your shoes into the cages. Advantage: You can using the same shoes for the bike and the run. You gain a little more efficiency by applying power during more of your cycling stroke (push down and pull up). Disadvantage: Mid-level efficiency. Takes some getting used to, particularly when mounting and dismounting.
- Clipless pedals are specialized pedals that your shoes attach to when mounting. Advantage: Provides the most efficient transfer of power to the pedals. Disadvantage: You have to buy cycling shoes. You have to learn to properly mount and dismount your bike. You have to switch shoes in transition.
While the disadvantages of clipless pedals may sound significant, the advantage is so great that this is often one of the first investments (likely after a Tri Suit), that a new triathlete makes. That said, flat pedals make a solid (and common) choice for first timers.
Socks
Many triathletes opt not to wear socks, particularly for shorter races. They are a pain to get on over your wet (and often dirty) feet after the swim. Triathlon specific cycling shoes are designed to be worn with or without socks and allow your feet to dry on the bike. It’s your option to put on socks, but either way, try out your choice during training.
Cycling clothing
Last, but not least, you need something to wear on the bike. If you opted for a Tri Suit, you are all set. If you opted for a swimming suit, you can continue to wear it. However, you may want to pull on a pair of cycling shorts and jersey, or running shorts and shirt, or some combination. Pretty much anything that is comfortable to you is fine. Ideally, however, you want something relatively form fitting that isn’t going to catch the wind.
Running gear
If you read this blog, you probably already know what to wear for the run portion of a triathlon. Here are some tri-specific considerations.
Running Clothing
If you are wearing a Tri Suit, you will continue to wear that. If you opted to put cycling shorts over a bathing suit, you will probably want to switch to running shorts (still over the bathing suit) for this leg.
Running Shoes
For the run leg, you will need running shoes. If you wore cycling shoes for the cycling leg, you will need to change them before the run.
If running is not your primary sport, it might be time to head to the local running shop to be fitted for running shoes. The best shoes for you are the ones that fit your feet and feel good when running. Let a professional make recommendations. Try many pairs. Pick shoes that feel great right out of the box. Don’t be swayed by color or style. Your feet will thank you.
If you opted for no socks on the cycling leg, you have another opportunity to put them on before the run, but many triathletes go without.
Race belt
Runners will be used to wearing a race bib during a race. Recall that a race bib has your race number.
In a triathlon you race bib is usually only required during the running leg (check your race instructions or ask at packet pickup to be sure). For this reason, you may want to purchase a race belt. It’s a thin elastic belt that goes around your waist and holds your race bib. It’s easily strapped on before the run.
How do I train?
Training for a Triathlon is more complex than training for an individual event. You will need to be prepared for each event, the transitions between events, and the overall effort and duration of the event.
This article is not intended to teach you how to train for running biking or swimming. Rather we will focus on the unique aspects of triathlon that will affect your training.
You may want to consider hiring a coach, or at least using a training plan, to guide your training.
The Swim
Except those with a strong swimming background, the swim may be the biggest challenge for a new triathlete. Getting ready for the swim portion of a triathlon has three stages:
-
First, master swimming in a pool. Swimming is a skill. So regardless of how fit you are, you will need to learn proper swimming form to succeed in a triathlon. If you have no swimming experience, professional lessons are recommended. You may consider individual lessons, group lessons at a club or community center, or a master’s swim program.
-
Second, learn to swim in open water. While some triathlons have a pool swim, most include a swim in a river, lake, or bay. While open water is in theory no different from swimming in a pool, there are many practical differences: cold, waves, current, wind, inability to stand, lack of lane lines, and distance from the edge. The result is new swimming skills to learn (e.g. swimming in a wetsuit, sighting, dealing with waves) and psychological barriers to overcome. Local triathlon clubs are an excellent resource for learning and practicing open water swimming.
-
Third, learn to swim in a crowd. Triathlon swims are crowded and chaotic. It is not uncommon to get elbowed, kicked, and swam over multiple times during a race. Practicing swimming in close proximity to others and navigating around swim buoys are important skills. Most importantly, learn to keep focused on your swim and ignore distractions. Again, local triathlon clubs are your best resource.
You may have assumed that triathlon requires you perform a freestyle swim (e.g., front crawl). In fact, any stroke is fine, though freestyle is likely your fastest approach. Beginners often utilize breast stroke as a way to take a break and get their bearings. In fact, some first timers use breast stroke exclusively. While not the fastest approach, it is perfectly fine. It is equally important to become comfortable floating on your back as a way to get out of trouble or overcome panic. Learning these tools is key to success.
Beyond mastering the skills, you also have to be able to complete the swim. So practice the required distance, first in a pool, and then in a body of water similar to your target race. Also, be sure to practice with the gear you plan to race in, particularly a Tri Suit and/or wetsuit (if you plan to use them). In addition, while not used in a race, when you practice in open water, be sure to use a swim buoy (here’s an example) for visibility. And never swim alone.
Videos on refining your swim stroke, swimming in open water, and using a wetsuit can be found in the Other Resources section.
The Bike
If you do not already know how to ride a bike, you may want to seek help. Get lessons. Even if you already know how to ride, it’s a good idea to improve your riding skills, through practice or a riding skills class. You’ll want to be good at mounting and dismounting your bike, riding near other riders, making turns (including u-turns), changing gears, climbing, descending, and using a water bottle while riding. Understanding the gearing of your bike is also important, particularly on hilly terrain.
Train for the bike leg as you would any other race. Over time, you will want to increase your distance until you reach at least your target race distance. Be sure to utilize the equipment you intend to use in the race, including shoes and pedals. Do not wait until close to race day to utilize the pedals you intend to use. Practice in your Tri Suit or other race clothing. If you plan to race without socks, practice it. At least once, be sure to cycle immediately after your swim, so you are used to mounting your bike and riding wet.
A flat tire can ruin your race day. Carry a flat kit (tire levers, spare tubes, CO2 cartridges and valve adapters) on your bike. Learn how to repair a flat and practice the skill as part of training. Be ready on race day.
The Run
Train for the run leg as you would any other running race. Over time, increase your distance until you reach at least your target race distance. Utilize the shoes and other clothing you intend to wear, including socks. Try out your race belt. At least once, be sure to run immediately after a swim, so you are used to running in a wet bathing suit or Tri Suit.
It is important to realize that many people walk for at least part of a triathlon run. If you are injured or running just isn’t for you, you can even choose to walk the entire run. There is absolutely nothing wrong with this. You pick the best strategy for you. If that includes a periodic run/walk strategy, go for it. Just be sure to have a plan and practice it in advance.
Bricks
A unique aspect to triathlon is doing differnt sports back-to-back. This is not as simple as it sounds and is worth practicing.
Any workout that includes two or more different sports back-to-back is called a “brick” workout. It is thought that the term “brick” refers to the way your legs feel when you start to run after cycling. Regardless, practice is recommended.
Try swimming and then immediately switch to cycling. Try cycling and then switch to running. When doing this, consider these aspects:
-
While you could swim your target distance and then cycle your target distance (or cycle and then run), you don’t necessarily have to do that. Even halving the target distances (or even less) is enough to give you an idea of what it will feel like.
-
When you start the second leg of a brick workout, you will already be warmed up. However, your body will still need to adjust to the next exercise, due to the new body position, motion, and level of exertion. Take your time. Give yourself some grace. Go easy for a bit before accelerating to your planned race pace.
-
For a bike-run brick, your legs will need to adjust to the cadence difference between the bike and the run. One way to alleviate this is to lower your gear and spin faster and lighter for the last half mile (or so) of your bike leg.
-
Do several brick workouts over time (perhaps one every 2-3 weeks). You will start to get used to how it should feel.
Transitions
Transitions are the fourth discipline of triathlon. Your overall race time includes the two transitions (swim to bike and bike to run). So it is advantageous to get good at transitioning quickly.
How will you do that? Practice. Set up a transition area (more on this below). Do a couple of minutes of swim, exit your swim, run to your transition area, and start your transition. Practice the motions of taking off your wet suit, getting on cycling helmet, and shoes, running with your bike to an imaginary mount line, and mounting your bike. Practice a similar process with your bike to run transition.
Minutes saved on transition are free speed for the overall event.
Videos on setting up transition and removing a wetsuit can be found in the Other Resources section.
Fueling
A triathlon is a relatively long event. Nearly any triathlon is long enough to warrant fueling during the race.
The good news is there are several opportunities to take in fuel during a triathlon:
- In transition: Leave some gels, gummy candies, and/or hydration in transition to grab quickly as you pass through.
- On the bike: Carry hydration in one or more bike bottles on your bike. By using a drink mix with electrolytes and/or carbohydrates, you can fuel and hydrate as your ride. Some triathletes also carry gels or gummies on the bike for additional fueling.
- On the run: For longer runs, you may want to carry additional water, drink mix, or gels/gummies, on the run.
The simplest choice is to fuel on the bike. This is typically the longest segment of the race and has less bouncing and more carrying capacity than the run. In shorter races (sprint and olympic distances) you are typically limited to what you can carry on the bike. Longer races often have hydration stations where you can swap bottles during the bike leg.
Most races include hydration/fueling stations on the run, so you may not feel the need to carry your own.
As with any sport, fueling and hydration are important for longer races (more than 45 minutes to an hour), as your body will deplete its hydration and glycogen stores over time. Hydrate and fuel early and often. Don’t wait until you get thirsty.
It is important to plan your fueling strategy ahead of time and practice your fueling strategy during training. The amount, brand, flavor, and forms of fuel/hydration that works best is specific to each individual. In addition, through practice you can learn to tolerate more intake during your activity without stomach upset. Practice what works best for you ahead of race day.
How do I know I’m ready to sign up?
So, you’ve started your training? How will you know that you are ready to sign up for a race? You’ll want to have enough experience to be confident that you can be race ready by race day.
Here are a few criteria you may want to have met before you sign up:
- You are proficient at swimming (including open water, if applicable), biking, and running
- You have the equipment you intend to use on race day
- You can execute the target distance of each individual race segment
- You have the endurance to last the entire duration of the event
The last one is tricky, since each portion of the event requires a different level of effort. On rule of thumb you might use is whether you can complete twice the bike distance or twice the run distance in one session.
This criteria doesn’t mean you’r ready to go. Go back to the section on training and keep practicing all of the elements. But you can now think about signing up for your first event.
Choosing the right event
Once you are ready to sign up for a race, you need to find some to choose from. once again, a local triathlon club is a good resource. Ask others what the best races are near you.
You can also look online. Sites like Find a Race and TriFind are good resources.
To select your first race, consider these criteria:
- Location: How far are you willing to travel? Flying is costly and flying with your bike is tricky, so a local race may be your best bet.
- Race distance: It is advisable to start with a Super Sprint or Sprint as your first race.
- Time cutoffs: Many races require you finish each leg of the race by a specific time. Make sure you will be able to make each cutoff. If you don’t, you’ll likely not be allowed to finish the race.
- Terrain: If you aren’t yet comfortable with an open water swim, choose an event with a pool swim. Do you prefer a flat course for the bike and/or run, or do hills suit your strengths?
- Lead time: How much longer will you need before the race to finish training?
- Cost: Unfortunately triathlons are expensive events to host. They typically require multiple permits, a large site for transition areas, and a lot of manpower. Local race companies typically put on more economical events, and shorter race distances are usually cheaper.
- Format: If you prefer a Duathlon, Aquabike, or Paddle Tri, look for races that offer your desired format.
Many (but not all) races are sanctioned by USAT, the governing body of USA triathlon. If so, you will be required to be a member of USAT to participate. You can obtain a single day membership, an annual membership, or a multi-year membership, before you sign up for the race. You can get this at the USAT website.
Your first event
The day for your first event is finally here. Let’s consider how to execute your first race.
Arrival
You’ll want to arrive at the race wearing at least the lowest layer of clothing you will use for the race. So, typically this would be your swim suit or Tri Suit.
Before the race, you will need to pick up your race packet. You can typically do this on race morning, but there is often a packet pickup event or race expo ahead of time (typically the day before). Note: USAT rules require you to present ID to pick up your race packet. So, make sure you bring it.
In your packet, you will typically find
- Your swim cap. Double check that you have the right color for your assigned swim wave.
- Stickers with your race number. These go on your helmet and bike.
- A bib with your race number. This is typically worn during the run.
- A timing chip. Typically this is a reusable or disposable strap that goes on your ankle.
- Other race goodies.
The first thing you will do is to apply the stickers. There will likely be between one and three small stickers for your helmet. One typically goes on the front, and if there are more, they typically go on the sides. Ask if you need directions. The larger sicker typically goes on your bike, either on the top tube or the seat post.
If an ankle-based timing chip is being used, put your timing chip around your ankle. It doesn’t usually matter which, but sometimes the timing company will specify one or the other. Be sure when you put it on that there’s nothing on underneath it and that it fits snugly. If a sticker is used (rather than velcro), you should dry-fit first and then peal and stick.
Once you’ve done that, grab your gear (including your bike) and head to the body marking area, which is likely near the transition area. Your arms and legs will be labeled with your race number and information about your age, race event, and distance. This information allows you to know which competitors on the course are in your event and age group. Note that your body marking will eventually wash off, but in the mean time, it is a sign to all that you rocked a triathlon.
Next, go to the transition area. This is where you will put your bike and other gear during the race and where you will go between each leg. This is typically an athlete only area, so any supporters you brought with you will have to watch from afar.
Setting up transition
The transition area will likely consist of a set of bike racks. For some races, you may be allowed to rack your bike anywhere. In others, you are limited (usually based on your race number) to a specific rack, or even a specific location on the rack. Find the right spot for you.
Before you rack your bike, give it a final check:
- Tires are at the desired pressure
- Seat is at the desired height
- Brakes are working
- Bike is in a low gear (this makes it easy to pedal when you mount)
Put your water bottle on your bike.
If possible, you want to rack your bike by hanging the nose of your seat on the rack bar and letting your front wheel land on the ground (back wheel will be in the air). If you can’t do this, due to the geometry of the rack or the bike, ask for assistance. Set your bike so that the down side is alternating with the adjacent bikes. You don’t want your front wheel to be down on the same side of the rack as the bikes next to you.
Now you will lay out your gear. Lay a towel next to your front wheel. Take no more than 18 inches of horizontal space. Lay out your gear in the order you intend to use it, including
- Something to wipe your face and feet with after the swim
- Glasses if you need them
- Hydration and/or fuel
- Your biking gear, including helmet, shoes, and any clothing you need
- Your running gear, including shoes, any clothes you need, and your race belt with race bib attached
Before you leave transition and head to the swim start, take a moment to orient yourself. Now is the time, as it will be much more chaotic during the race. Find the swim in, where you will enter transition after the swim. Stand at the swim in and look at the location of your bike. Count the rows and racks you will pass along the way to your bike. Locate the bike out, where you will take your bike to start riding. Locate the mount line. You will need to cross this line with your bike before you ride. Locate the bike in, where you will renter transition with your bike. Count the rows and racks back to your spot on the rack. Locate the run out, where you will start your run. Once you have that in your head, you are ready to race.
Videos on setting up transition can be found in the Other Resources section.
Executing your race
The most important rule of any race is “Nothing new on race day!” So you should already have practiced everything you are going to wear, drink, eat, and do during the race.
Warm up
Most races have a warmup swim area. It’s time for a warmup swim. This is especially important if the water is cold, as you don’t want your first exposure to the water to be at the start of the race. Put on your wetsuit, swim cap, and goggles and get in the water. Let some water into the front of your suit. It will warm up and act as an insulating layer, as well as loosen up the suit. Swim around a bit. Practice nice slow, controlled strokes. Get used to the temperature. Notice if the water is clear or murky.
Look at the swim course. There are likely a few brightly-colored buoys in the water (typically large blow up triangles or circles). Figure out the path of the course and which side of the buoys you will be on. Count the turns. Count any extra buoys along long straightaways. Remember this for the race.
As race time nears, look around and notice how many people have the same color swim cap as you do. Those people are in your start wave. A triathlon typically starts groups of people in a wave, typically arranged by gender and age. Waves typically start a few minutes apart, reducing the chaos at the start.
The swim
When it’s time for your wave, follow the people with your swim cap color. There will likely be a choke point that you must pass, where they will count you in. This is for safety. A well run event will keep track of the number of people who enter the water, and the number of people who exit the water.
When when you hear the start signal … wait. Really. Count to five and let everyone go ahead of you. Then start swimming. Those five seconds will mean nothing in the grand scheme of things, but it will save you from most of the chaos. Try to keep focused on your swim. This is your race. You don’t have to change your plans based on anyone else. Follow the course as you remember it. Sight periodically (switch to breast stroke if needed) and make sure you are going the right way and that you know where the next buoy is. Make sure you round each buoy on the correct side.
Your swimming strategy will include the pace and strokes you intend to use. Make sure that your strategy is paced so that you are not completely out of energy after the swim. You still have a lot of racing left. Keep your effort manageable. Remember, the race is never won in the swim, but it can be lost in the swim.
If you have any trouble during the swim, switch from freestyle to breast stroke. If needed, you can flip over onto your back and float. If you need help, call out, and, if possible, raise one arm in the air. A well run triathlon has a water safety crew on paddle-boards, kayaks, and/or boats. You can swim to them, or they can come to you. You may hold on to a boat for as long as you want without penalty, as long as you don’t make forward progress. In shallow water, you are even allowed to stand, as long as you don’t make forward progress. That said, if you need to be pulled from the water, your race is over.
As you approach the end of the swim, you may see the bottom and be tempted to stand up. Don’t. Keep swimming until your hand touches the bottom. It is much more efficient to swim than to walk through the water.
Get out of the water and head for the transition area. Along the way, you can pull your wetsuit down to your waist and remove your swim cap and goggles.
T1
In transition, find your bike. Wipe your face, put the towel on the ground, and stand on it. Remove your wetsuit and put it with your gear. Wipe your feet. Take in any fuel and hydration you planned for. Put on any clothing you need for your ride, including cycling shoes. Put on your helmet. Now remove your bike from the rack and head for the bike out.
The bike
Walk or run with your bike to the mount line. Cross the mount line, and then mount your bike and go.
Initially stay in a low gear and pedal easily. Perhaps take in some additional hydration and/or fuel.
As you start feeling ready, ride at the planned intensity. Remember to keep your intensity below the maximum you could sustain. You will need to have energy left over for your run.
During your ride, don’t forget to periodically take in hydration and fuel. A good rule of thumb is to take in at least one bottle, with carbs and electrolytes, per hour. That means you should carry and consume one bottle for a sprint and two for olympic distance.
When you have roughly half a mile left in your ride, drop down a gear and spin fast and easy. This will help you when you get ready to run.
When you get to the end of your ride, dismount before the mount line and walk or run to your transition area.
T2
When you get to your rack area, rack your bike first, and then take off your helmet. Take in any last minute fuel and hydration. Now make any clothing or shoe changes required, strap on your race belt and bib, and head to the run out.
The run
If you practiced brick workouts, you will know that the first part of your run will feel terrible. Don’t panic. Go slow. Try to keep your steps light and your cadence high. Over time, your body will adapt.
This is your last leg, but you still have to pace yourself carefully. Don’t panic if your pace is lower than you expected. You worked hard. Just keep the effort sustainable. Slow down if you need to.
If you planned a run-walk strategy, remember to execute it as planned.
The finish line
Congratulations! You finished!
Take a moment to reflect on what went well and what didn’t? What will you repeat next time? What will you change?
Race rules
For safety reasons, triathlons are often stricter about the rules than say a running race. So, it’s important to know the rules. Here are some rules that will most commonly affect you:
-
Packet Pickup: Only you can pick up your race packet. You must present identification to pick up your packet.
-
Music: No music (headphones or otherwise) is allowed. That said, many local races allow music on the run only, as long as at least one ear is unblocked.
-
No Littering: You may not drop trash (anything really) anywhere except designated areas (typically the transition zone and near hydration stations).
-
Swim
-
Standing: You may stand up during the swim (assuming shallow water), as long as you don’t make forward progress
-
Holding On: You may hold on to a fixed object (e.g., a safety boat), as long as you don’t make forward progress
-
Footwear: No footwear is allowed during the swim.
-
-
Bike
-
Helmet: Your helmet must be on (and strap fastened) anytime your bike is not on the rack.
-
Mount Line: Mount your bike after you cross the mount line and dismount before it.
-
No blocking: You must ride as far to the right as safety allows. You may not ride adjacent to another cyclist.
-
No Drafting: You may not follow another bike any closer than 10-12 meters (5-6 bike lengths, depending on the race). Once you enter this draft zone, you must quickly pass them or fall back.
-
Overtaking: If someone overtakes you (their front wheel passes yours), you must let them pass and drop back behind their draft zone.
-
Yellow Line: When biking, you may not cross the yellow line (middle of the road) unless directed to by a course marshall (e.g., at a turn or turnaround).
-
You can find the complete USAT rules here.
Conclusion
I hope you’ve found this informative and useful. Most importantly, I hope I have inspired you to give Triathlon a try.
Other resources
- Best in the West Tri 101 Video
- Effortless Swimming
- How to Put on a Wetsuit
- How do I Put on an Open Water Swimming Wetsuit?
- Watch This Before Your Next Open Water Swim
- USAT Rulebook
As always: If you move with a purpose, you’re an athlete, and we’re here to help you reach your goals. If you need help, check out AllPaceAthletics.
Be well, and be safe.
Coach Mark
Owner and Coach
AllPace Athletics
- Update: A previous version of this article stated incorrect information regarding water temperature and wetsuit use.
- Update: A pointer to the USAT rulebook has been added to the resources.
- Update: Added a paragraph on flat tires.